 English
 русский
 Español
 عربى
عربى

Content
- 1 The Short Answer: A Broken Kneader Is Fixable — If You Know Where to Look
- 2 What Happened: How Our Kneading Machine Broke Down
- 3 Diagnosing a Kneader Failure: Where to Start
- 4 The Repair: What We Actually Did to Fix the Kneader
- 5 Common Kneader Failure Points and What Causes Them
- 6 Understanding the Internal Kneader: Why It Breaks Down the Way It Does
- 7 What We Changed After the Breakdown
- 8 Preventive Maintenance Schedule for a Kneading Machine
- 9 When to Call a Specialist Instead of Fixing It Yourself
- 10 Lessons From Our Kneader Breakdown — Summarized
The Short Answer: A Broken Kneader Is Fixable — If You Know Where to Look
When our kneading machine broke down mid-batch, the first reaction was panic. We had material in the chamber, a production deadline, and absolutely no idea whether we were looking at a 20-minute fix or a two-week parts wait. It turned out to be neither. Most kneader failures fall into three categories: mechanical wear, electrical faults, and operator-related issues — and the majority can be resolved on-site without sending the entire unit back to the manufacturer.
This article walks through exactly what happened with our machine, how we diagnosed it, what the repair involved, and what we changed afterward to prevent it from happening again. If your kneader is down right now, start with the diagnostic section. If you're reading this before trouble hits, the maintenance table near the end is worth your time.
What Happened: How Our Kneading Machine Broke Down
It started with noise. About forty minutes into a standard mixing cycle, the kneader began producing a rhythmic grinding sound — not a catastrophic bang, just a low, persistent metal-on-metal tone that wasn't there the day before. We stopped the batch, cleared the material as best we could, and powered down.
On visual inspection, nothing looked obviously wrong. The rotor blades were intact. The chamber walls had no visible cracks. The drive belt was under normal tension. But when we tried to restart, the motor ran but the rotors didn't turn. The gearbox had seized.
This is actually one of the more common failure modes in internal kneaders used for rubber and polymer compounding. The gearbox in a kneader sits between the motor and the rotor shafts, reducing speed and multiplying torque. When lubrication fails — either because the oil level dropped, the oil degraded, or a seal let in contaminants — the gears begin running metal-to-metal. If you catch it early, you get a grinding noise. If you miss that, you get a seized unit.
In our case, a worn shaft seal had allowed fine rubber dust to migrate into the gearbox over several months. The oil had become contaminated and lost its viscosity. We hadn't caught it because our maintenance checks weren't looking at oil condition — just oil level. That distinction matters, and it's something we changed immediately after the repair.
Diagnosing a Kneader Failure: Where to Start
If your kneading machine has stopped working or is behaving abnormally, resist the temptation to restart it repeatedly. That's how minor problems become major ones. Instead, work through a structured diagnosis before touching anything else.
Step 1 — Characterize the Symptom
The nature of the failure tells you a lot about the cause. Use the following as a starting framework:
- Motor runs, rotors don't move: Likely a gearbox, coupling, or key/keyway failure
- Motor doesn't start: Check electrical supply, overload relay, thermal cutout, or VFD fault codes
- Rotors turn but mixing is poor: Worn rotor blades, incorrect clearance, or temperature control issue
- Unusual noise during operation: Bearing wear, foreign object in chamber, or lubrication failure
- Overheating: Blocked cooling channels, failed temperature sensor, or excessive friction in the drive train
- Material leaking from seals: Worn tip seals or rotor end seals, typically requiring scheduled replacement
Step 2 — Check the Electrical Side First
Electrical faults are often easier and cheaper to fix than mechanical ones, so rule them out first. Check incoming voltage at all three phases — a kneader running on two phases will overheat the motor and stall under load. Inspect the overload relay setting and compare it to the motor's nameplate current. Look for fault codes on the variable frequency drive if the machine uses one. In many cases, what looks like a mechanical breakdown is actually a tripped protection device that resets with the push of a button.
Step 3 — Inspect the Drive Train
With power isolated and locked out, manually attempt to rotate the rotor shafts. On most kneaders, you can use a turning bar or socket on the rotor shaft end. If the shafts won't budge, the problem is in the gearbox or the rotors themselves are seized — possibly due to hardened material inside the chamber. If the shafts turn freely but the motor doesn't drive them, the issue is in the coupling between motor and gearbox.
Step 4 — Check Lubrication
Pull a sample of gearbox oil. It should be relatively clear or amber-colored depending on the lubricant type. If the oil is black, milky, or has visible particles, contamination is the issue — not just low level. Milky oil means water ingress. Black oil with metallic particles means gear wear. Dark, viscous oil with rubber particles means seal failure, which is what we found.
The Repair: What We Actually Did to Fix the Kneader
Once we confirmed the gearbox was the problem, the repair process broke down into five stages. The entire job took about three days including parts procurement, which is on the faster end for gearbox work — mainly because we had a reasonable relationship with a local industrial supplier who had the shaft seal in stock.
Stage 1 — Clear the Chamber
Before any mechanical work, the mixing chamber had to be cleared. We were lucky — the material hadn't fully cured and could still be removed manually with heat applied to the chamber walls. In cases where material has hardened completely, removal can take longer than the actual repair. This is one reason why acting quickly when you first notice symptoms pays off.
Stage 2 — Drain and Flush the Gearbox
We drained the contaminated oil completely, then flushed the gearbox with a light flushing fluid to remove residual sludge and particles. This step is often skipped when people are in a hurry to get back up and running, and skipping it means you're putting fresh oil into a contaminated environment. The sludge will degrade the new oil within weeks.
Stage 3 — Replace the Failed Shaft Seal
The worn rotor shaft seal was the root cause. These seals sit between the kneading chamber and the gearbox housing, preventing process material from migrating into the lubricant system. On our machine, the seal is a lip-type radial seal with a PTFE running surface. The original had been in service for roughly 4,200 hours — the manufacturer recommends inspection at 3,000 hours and replacement at 5,000 or at any sign of wear, whichever comes first. We were within the interval on paper, but the operating conditions — abrasive compound, elevated temperature — had accelerated wear.
Seal replacement on an internal kneader is not trivial. The rotor shaft has to be partially withdrawn to access the seal housing, which means disconnecting the coupling and supporting the shaft properly. We used the machine's own maintenance lifting points and a shaft support fixture borrowed from a neighboring plant. Attempting this without proper shaft support risks damaging the bearing housing.
Stage 4 — Inspect and Reassemble
With the shaft partially out, we took the opportunity to inspect the rotor bearing. It showed early signs of pitting on the inner race — not critical yet, but noted. We recorded it in the maintenance log and flagged it for replacement at the next planned shutdown. The gears themselves, despite the oil contamination, showed no scoring beyond normal wear patterns. This was partly because we'd caught the problem before the machine had run long enough to cause gear damage.
Stage 5 — Refill, Run-In, and Verify
We refilled the gearbox with the manufacturer-specified gear oil — ISO VG 220 in our case — to the correct level mark. Then we ran the kneader unloaded for 30 minutes while monitoring gearbox temperature and listening for abnormal sounds. Temperature stabilized at 52°C, which is within the normal operating range. We then ran a test batch at 60% of normal fill weight before returning to full production.
Common Kneader Failure Points and What Causes Them
Our gearbox contamination issue isn't unique. After speaking with maintenance engineers at several other compounding operations, a clear pattern of common failure modes emerged. The table below summarizes the most frequently reported problems with internal kneaders, their typical causes, and what the repair usually involves.
| Failure Mode | Typical Root Cause | Average Downtime | Preventable? |
|---|---|---|---|
| Gearbox contamination | Worn shaft seal, missed oil condition checks | 2–4 days | Yes |
| Rotor tip seal leakage | Normal wear, abrasive compounds | 4–8 hours | Yes (scheduled replacement) |
| Overload motor trip | Excessive fill, cold material, relay set too low | 30 minutes – 2 hours | Yes |
| Rotor blade wear | Abrasive compounds, excessive clearance | 1–3 days | Partially (clearance monitoring) |
| Cooling channel blockage | Scale buildup, incorrect water quality | 1–2 days | Yes |
| Coupling failure | Misalignment, shock loading, age | 4–12 hours | Yes (alignment checks) |
What stands out in this table is that every failure mode listed is either fully or partially preventable. None of them are random acts of mechanical fate. They all have precursors — signs that show up before the machine stops — and most of them can be caught by a maintenance program that goes beyond simple visual inspection.
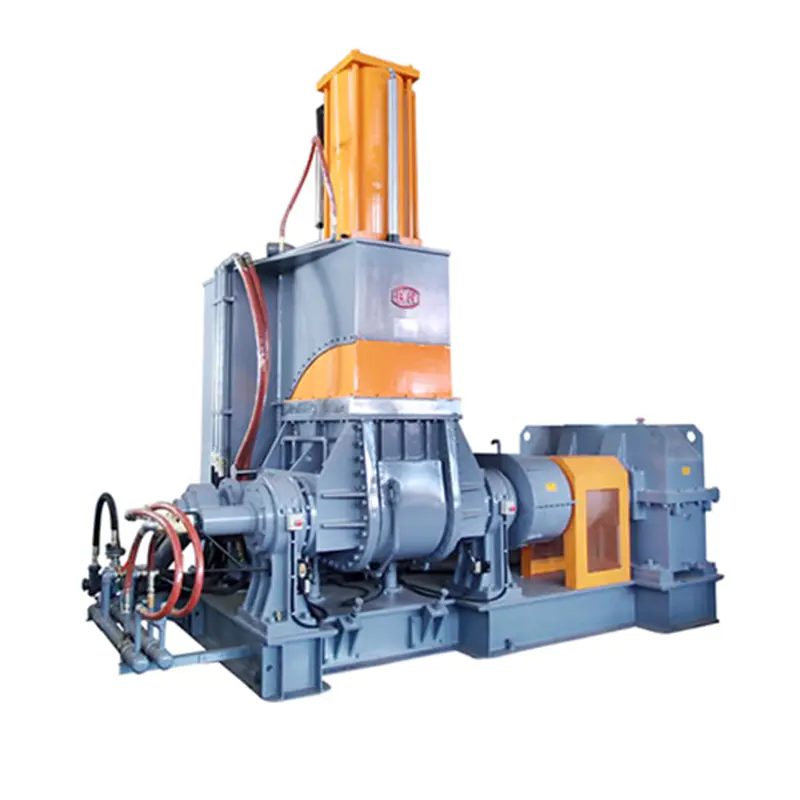
Understanding the Internal Kneader: Why It Breaks Down the Way It Does
To maintain a kneader properly, it helps to understand what the machine is actually doing and why that puts specific components under stress. An internal kneader — sometimes called a Banbury-type mixer or simply a kneading machine — works by rotating two interlocking rotors inside a sealed mixing chamber. Material is loaded through a top ram, compressed, sheared between the rotor blades and chamber walls, and progressively homogenized.
The forces involved are substantial. A production kneader mixing carbon-black-filled rubber compound might operate at torques exceeding 50,000 Nm on the rotor shafts. That load passes directly through the gearbox. The gearbox on a kneader isn't a light-duty unit — it's a heavy industrial helical or spur gear set with large, case-hardened gears — but it still has limits, and those limits are defined by lubrication quality, bearing condition, and seal integrity.
The thermal environment adds another layer of stress. Kneaders typically operate at chamber temperatures between 60°C and 180°C depending on the compound. Some processes go higher. The heat gets into the machine structure, affects seal materials, and accelerates lubricant degradation. A gearbox oil that's rated for 5,000 hours at 60°C might degrade in 2,500 hours if ambient temperatures around the gearbox are consistently 90°C.
The sealing system is the bridge between the high-temperature, contaminated process environment and the clean, lubricated drive system. When it works, you never think about it. When it fails, the gearbox follows shortly afterward.
What We Changed After the Breakdown
Getting the kneader running again was step one. Making sure it didn't break down the same way again was step two. We made four specific changes to our maintenance approach, none of which required significant investment.
Oil Condition Monitoring Instead of Level Monitoring
We added a simple oil condition check to the weekly maintenance routine. This involves drawing a small sample from the gearbox drain point and doing a visual check — color, clarity, presence of particles or foam. It takes about five minutes. We also send a sample for lab analysis every six months. The lab test costs roughly €80 per sample and tells us viscosity, contamination level, and oxidation state. That's cheap insurance against a €15,000 gearbox rebuild.
Reduced Seal Replacement Interval for Our Conditions
We'd been following the manufacturer's standard interval of 5,000 hours for shaft seal replacement. After the breakdown, we spoke with the OEM's service team and learned that for compounds with high filler loading — which describes most of what we run — they recommend reducing this to 3,000 hours. We updated our maintenance schedule accordingly. The seals themselves cost around €120 each. Replacing them proactively is a fraction of the cost of a contamination-induced gearbox failure.
Temperature Trending on the Gearbox
We added a cheap infrared thermometer check to the daily operator rounds. The gearbox surface temperature is logged each morning. Our baseline in normal operation is 48–55°C. If it goes above 65°C without an obvious explanation (like an unusually hot ambient day), that triggers an investigation before it becomes a failure. This kind of simple trending catches lubrication problems early — a degrading lubricant loses thermal efficiency and the gearbox runs hotter.
Spare Parts Stocking for the Kneader
One of the things that extended our downtime was waiting for the shaft seal to arrive. We now keep one set of rotor tip seals, one shaft seal per rotor, and one motor coupling element on the shelf. The total parts value is under €500. The parts take up a small shelf space. But having them available means that if the same failure happened tomorrow, we'd be back up in one day instead of three.
Preventive Maintenance Schedule for a Kneading Machine
Based on our experience and conversations with other operators, the following schedule represents a practical baseline for maintaining an internal kneader in continuous production use. Adjust intervals based on compound type, operating hours per day, and environmental conditions.
| Frequency | Task | What to Look For |
|---|---|---|
| Daily | Gearbox temperature check (IR thermometer) | Deviation from baseline by more than 10°C |
| Daily | Listen for abnormal noise | Grinding, knocking, or metallic rattling |
| Weekly | Gearbox oil level and visual condition | Low level, discoloration, particles, foam |
| Weekly | Rotor seal inspection (visual) | Material leakage past the seal area |
| Monthly | Cooling system flow and temperature delta | Reduced flow rate, reduced delta-T |
| Monthly | Drive coupling inspection | Wear on flexible elements, misalignment signs |
| Every 3,000 hours | Shaft seal replacement (abrasive compounds) | Proactive — do not wait for leakage |
| Every 5,000 hours | Full gearbox oil change | Complete drain, flush, and refill with fresh oil |
| Every 6 months | Oil laboratory analysis | Viscosity, water content, particle count, oxidation |
| Annually | Rotor clearance measurement | Compare against OEM specification, note trend |
When to Call a Specialist Instead of Fixing It Yourself
Not every kneader repair is within the scope of in-house maintenance. Knowing where that line is can save you from making a problem worse.
In-house work is generally appropriate for: seal replacements where the procedure is documented, oil changes and condition monitoring, coupling element replacement, electrical fault diagnosis, and basic rotor inspection with the chamber open.
Specialist involvement is advisable for: gearbox disassembly and gear inspection beyond oil sampling, rotor removal and bearing replacement, chamber wall inspection for wear or cracking, alignment measurement and correction after major component replacement, and any situation where the failure mode is unclear after a thorough on-site diagnosis.
Some kneader manufacturers offer service contracts that include periodic specialist inspections. These can be worth the cost for machines running three shifts in continuous production, where unplanned downtime is very expensive. For machines that run one shift with planned weekly maintenance windows, a strong in-house program is usually sufficient.
One thing worth noting: if your machine is out of warranty and you're having to choose between a major repair and replacement, get a proper assessment before deciding. A well-maintained kneader can run reliably for 20–30 years. A machine that has been neglected and has accumulated problems in the gearbox, bearings, and rotor system simultaneously might cost more to repair than it's worth — but that assessment needs to be made by someone who has actually looked at the machine, not estimated remotely.
Lessons From Our Kneader Breakdown — Summarized
Going through the breakdown and repair process was not enjoyable, but it produced clarity about what we were doing wrong and what needed to change. If there's a short version of everything above, it's this:
- Checking oil level is not the same as checking oil condition — both matter, and condition matters more
- Seal replacement intervals from the manufacturer are for standard conditions; aggressive compounds or high temperatures warrant shorter intervals
- Temperature trending catches developing problems before they become failures
- Keeping a small stock of critical spare parts reduces downtime dramatically when something does go wrong
- Acting on early warning signs — noise, temperature rise, visual leakage — is always cheaper than waiting for a complete breakdown
The kneader has now been running for seven months since the repair with no further issues. The maintenance changes we made are not complicated or expensive. They're just more thorough than what we were doing before — and in retrospect, the gap between "thorough" and "adequate" was where the problem lived all along.
