English
 русский
 Español
 عربى
عربى

Content
- 1 What Kneading Actually Does to Bread Dough
- 2 Kneading Dough by Hand: Technique and Timing
- 3 Using a Stand Mixer with a Dough Kneader Hook
- 4 Kneading Dough in a Food Processor
- 5 Comparing All Three Kneading Methods Side by Side
- 6 How to Choose the Right Kneading Method for Your Recipe
- 7 The Role of Rest: Autolyse as an Alternative to Extended Kneading
- 8 Industrial and Commercial Kneader Machines: What Home Bakers Can Learn
- 9 Kneading Different Types of Dough: Special Considerations
- 10 Dough Temperature Control Across All Three Methods
- 11 Troubleshooting Kneading Problems Regardless of Method
- 12 Quick Reference: Kneading Times by Recipe Type
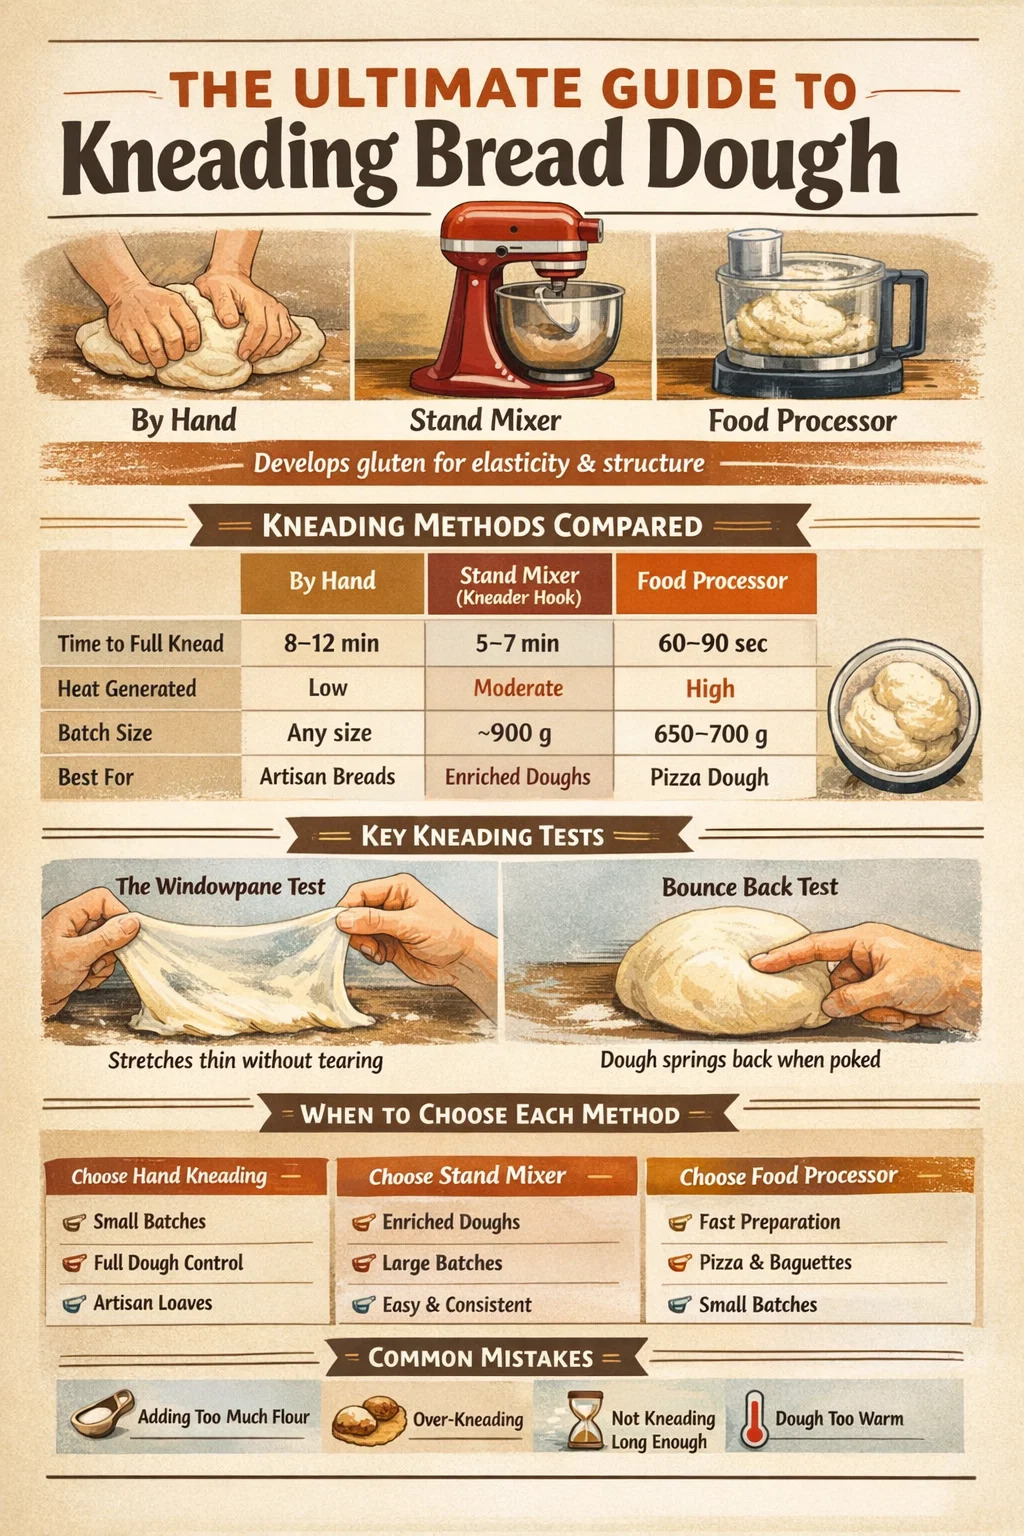
Whether you are making sandwich bread, pizza dough, or soft dinner rolls, kneading is the step that determines everything. You can knead dough effectively by hand in 8–10 minutes, with a stand mixer in 5–7 minutes, or with a food processor in just 60–90 seconds. Each method activates gluten differently and suits different bakers depending on their tools, batch size, and how much physical involvement they want in the process. This guide covers all three methods in detail — including technique, timing, common mistakes, and exactly when to use a kneader attachment versus doing it by hand.
Understanding what kneading actually does to dough makes it much easier to judge when you have done enough — and when you have gone too far. Gluten is a protein network that forms when flour hydrates and is worked mechanically. Kneading aligns these gluten strands into an elastic, smooth matrix that traps carbon dioxide from yeast fermentation, giving bread its rise and chewy structure. Without sufficient kneading, the dough tears, the crumb is dense and irregular, and the crust lacks chew. Over-kneading — primarily a risk with electric mixers — can break down the gluten and make the dough sticky and slack.
What Kneading Actually Does to Bread Dough
When flour and water first come together, gluten proteins — glutenin and gliadin — are scattered and disorganized. As you work the dough, these proteins hydrate and link together into long, elastic chains. The mechanical action of kneading stretches those chains, aligns them in parallel, and strengthens the network. This process is sometimes called gluten development.
A well-kneaded dough passes the windowpane test: you can stretch a small piece thin enough to see light through it without it tearing. If it tears immediately, gluten development is incomplete. If it feels rubbery and snaps back with unusual force, it may be over-kneaded or simply needs rest.
The protein content of flour directly affects how much kneading is needed. Bread flour contains roughly 12–14% protein, which forms a strong, extensible gluten network ideal for sandwich loaves and bagels. All-purpose flour sits at 10–12% and requires slightly less kneading time. Cake flour, at 7–9%, should not be vigorously kneaded at all since the delicate crumb structure of cakes depends on minimal gluten formation.
Hydration also plays a role. Wetter doughs — anything above 75% hydration — can feel difficult to knead by hand because they stick aggressively to surfaces. Firmer doughs at 60–65% hydration are much easier to handle on a countertop. Knowing your dough's hydration before you start helps you choose the right kneading method.
Kneading Dough by Hand: Technique and Timing
Hand kneading is the oldest method, and it gives you direct tactile feedback that no machine can replicate. You can feel the dough transform from a shaggy, rough mass into a smooth, supple ball. For most standard bread recipes, hand kneading takes between 8 and 12 minutes of continuous work on an unfloured or lightly floured surface.
The Standard Push-and-Fold Method
The most common hand kneading technique works as follows:
- Place the dough on a clean, dry work surface. Lightly flour only if the dough is extremely sticky.
- Press the heel of your dominant hand into the center of the dough and push away from your body with firm, even pressure.
- Fold the far edge of the dough back toward you, rotate the dough 90 degrees, and repeat.
- Maintain a steady rhythm: push, fold, rotate. Aim for about 100 strokes per minute.
- After 8–10 minutes, the dough should feel smooth, elastic, and slightly tacky but not sticky.
A common mistake is adding too much flour to stop sticking. Every extra tablespoon of flour changes the dough's hydration ratio, resulting in a tighter, drier crumb. Instead, try lightly oiling your hands and the surface, especially for enriched doughs made with butter or eggs.
The Slap-and-Fold Method for Wet Doughs
French bakers use a technique called the slap-and-fold — or "fraisage" in some contexts — for high-hydration doughs above 70%. Instead of pushing into the dough, you lift it, slap it down against the counter, then fold it over itself. This builds gluten tension without requiring additional flour. It looks aggressive but is highly effective for doughs that would otherwise stick and tear with standard kneading.
The slap-and-fold method typically takes 5–7 minutes because the impact and stretching develop gluten rapidly. The dough will initially cling to the counter and your hands, but by the 3-minute mark it should begin pulling away cleanly as the gluten network strengthens.
Signs Your Dough Is Fully Kneaded by Hand
- The surface is smooth and slightly shiny, with no rough or torn patches.
- The dough springs back when poked with a finger within 1–2 seconds.
- It passes the windowpane test: a stretched piece holds a thin, translucent membrane without tearing.
- The dough holds its shape as a ball rather than spreading flat on the counter.
Using a Stand Mixer with a Dough Kneader Hook
A stand mixer fitted with a dough hook — the component often called a kneader attachment — is the most popular machine-based option for home bakers. It handles medium-to-large batches without physical effort and is particularly useful for enriched doughs like brioche, where the addition of large quantities of cold butter makes hand kneading impractical.
For most bread doughs, a stand mixer kneader hook running on speed 2 will develop full gluten in 5–7 minutes. Some denser doughs, like bagel or pretzel dough at 56–60% hydration, may need 8 minutes. Over-kneading is a genuine risk at high speeds: running a mixer on speed 4 or above for too long can heat the dough through friction, weaken the gluten network, and produce an excessively sticky, degraded texture.
Stand Mixer Kneading: Step-by-Step
- Attach the dough hook to the mixer head and add all ingredients to the bowl.
- Mix on the lowest speed (speed 1) for 2 minutes to incorporate ingredients into a shaggy mass.
- Increase to speed 2 and knead for 5–7 minutes until the dough clears the sides of the bowl and wraps around the hook.
- Stop the mixer and perform the windowpane test. If the dough tears, knead an additional 2 minutes.
- For enriched doughs requiring butter addition, add cold butter in small cubes only after full gluten development — typically after 6 minutes of kneading at speed 2.
Common Problems with Stand Mixer Kneading
| Problem | Likely Cause | Fix |
|---|---|---|
| Dough rides up the hook | Hydration too high or speed too low | Push dough down, increase to speed 2 |
| Dough tears after 8 min | Insufficient hydration or cold ingredients | Add 1 tsp water, knead 2 more minutes |
| Dough becomes very sticky | Over-kneading at high speed | Stop immediately, chill dough 20 min |
| Motor sounds strained | Batch too large or dough too stiff | Reduce batch size or add water 1 tsp at a time |
| Uneven gluten development | Dry clumps not fully incorporated | Scrape bowl sides before kneading phase |
Batch Size Limits for Stand Mixer Kneading
Most home stand mixers have a 4.5–7 quart bowl and are rated for a maximum of 900 grams (about 2 lbs) of dough. Exceeding this stresses the motor, especially with stiff doughs. Commercial-grade kneader machines used in bakeries handle 5–50 kg batches, but home models are not designed for that load. If you regularly bake large batches, a dedicated spiral kneader or planetary mixer with a stronger motor is worth considering.
Kneading Dough in a Food Processor
The food processor is the fastest of the three methods and the most underrated. Using a standard metal blade or a dedicated dough blade, a food processor can develop full gluten in 60–90 seconds of processing. The rapid blade movement builds gluten through intense mechanical action rather than the slower stretching and folding of hand or mixer kneading.
The catch is heat. Food processors generate friction quickly, and dough temperature is critical to fermentation. Ideally, bread dough should finish kneading at a temperature between 24–26°C (75–79°F). If the dough exits the food processor warmer than 27°C (80°F), fermentation accelerates unevenly and can result in over-proofed, collapsing loaves. To counter this, use ice-cold water — even adding a few ice cubes — and make sure your flour has been stored at room temperature, not warmed.
Food Processor Kneading Method
- Fit the food processor with the metal blade or dough blade. Add all dry ingredients and pulse twice to combine.
- With the processor running, pour cold liquid through the feed tube in a steady stream over 15–20 seconds.
- Process continuously for 45 seconds after the dough forms a ball.
- Stop and check dough temperature with an instant-read thermometer. It should be below 27°C (80°F).
- Perform the windowpane test. If needed, process an additional 15–20 seconds. Do not exceed 90 seconds total.
What Doughs Work Well in a Food Processor
Food processors excel with lean, stiff-to-medium hydration doughs: pizza dough, French baguette dough, focaccia, English muffin dough, and simple sandwich loaves. They are less suited to enriched doughs with large amounts of butter or eggs, which can seize up or over-heat the fat content. They are also impractical for large batches — most home food processors can only handle 500–700 grams of dough at a time without straining the motor.
Why Dough Temperature Matters More in a Food Processor
Yeast activity roughly doubles for every 10°C rise in temperature between 20–38°C. A dough that exits a food processor at 30°C instead of 24°C will ferment significantly faster, which sounds helpful until the outer portion of the dough over-proofs before the center is ready. The result is uneven gas distribution, large irregular holes, and a gummy crumb. Using water at 4°C (straight from the refrigerator) instead of room-temperature water can reduce final dough temperature by 3–5°C — a meaningful difference when using a food processor.
Comparing All Three Kneading Methods Side by Side
| Criteria | By Hand | Stand Mixer (Kneader Hook) | Food Processor |
|---|---|---|---|
| Time to full gluten development | 8–12 min | 5–7 min | 60–90 sec |
| Heat generated | Low | Low–moderate | High |
| Max batch size (home use) | Unlimited (fatigue) | ~900 g | ~700 g |
| Tactile feedback | Excellent | None | None |
| Enriched doughs (brioche, etc.) | Difficult | Excellent | Not recommended |
| High-hydration doughs | Requires technique | Good | Difficult |
| Pizza / baguette dough | Very good | Very good | Excellent |
| Risk of over-kneading | Very low | Moderate (at high speed) | High (if over 90 sec) |
How to Choose the Right Kneading Method for Your Recipe
The right kneading method is not about preference alone — it depends on the dough type, your equipment, and your schedule. Here is a practical guide:
Choose Hand Kneading When
- You are a beginner learning to read dough feel and development stages.
- The recipe calls for a small single-loaf batch of 400–600 grams.
- You want full control over hydration adjustments as you work.
- You are making sourdough or other artisan breads where the slow gluten development is preferred.
- You do not own a stand mixer or food processor.
Choose a Stand Mixer Kneader Hook When
- You bake frequently and want to free up your hands during the kneading phase.
- The recipe is an enriched dough with significant amounts of butter, eggs, or milk (brioche, challah, cinnamon rolls).
- You are making a batch of 600–900 grams and want consistent results.
- The recipe specifically requires prolonged kneading, such as bagel or pretzel dough.
Choose a Food Processor When
- Speed is your priority and you are making a lean, low-enrichment dough.
- The recipe is for pizza, focaccia, or a simple French-style loaf.
- The batch is under 700 grams.
- You have cold water available and understand the dough temperature risk.
- You want to make fresh weeknight pizza dough in under 10 minutes total prep time.
The Role of Rest: Autolyse as an Alternative to Extended Kneading
Autolyse is a technique developed by French bread scientist Raymond Calvel in the 1970s that challenges the assumption that all gluten development must come from mechanical kneading. By mixing flour and water and letting the mixture rest for 20–60 minutes before adding salt and yeast, enzymes in the flour begin hydrating and organizing the gluten proteins passively. After a 30-minute autolyse, total kneading time by hand can be reduced from 10 minutes to as little as 4–5 minutes while achieving the same or better gluten structure.
This approach is widely used in sourdough and artisan baking. It results in a more extensible, relaxed dough that is easier to shape and tends to produce a more open, irregular crumb. The autolyse phase does not replace kneading entirely — it supplements it, allowing for gentler mechanical intervention that preserves the dough's extensibility.
A further development of this idea is the stretch-and-fold method, used during bulk fermentation instead of pre-fermentation kneading. The dough is folded over itself every 30 minutes for the first 2 hours of bulk rise — typically 4–6 sets of folds. Each set takes about 30 seconds. This technique produces exceptional gluten development for high-hydration sourdough loaves and ciabatta without any traditional kneading at all.
Industrial and Commercial Kneader Machines: What Home Bakers Can Learn
Commercial bakeries use spiral kneaders, planetary mixers, and continuous dough kneader machines to process hundreds of kilograms of dough per hour. Understanding how these machines differ from home equipment offers useful insight into why the dough hook speed and duration matter so much at the home scale.
A spiral kneader, for example, keeps the bowl rotating while the spiral arm kneads in the opposite direction. This achieves even gluten development with minimal friction heating — precisely the challenge that makes food processor kneading risky. Industrial spiral kneaders typically run at 60–80 RPM for lean doughs and 40–60 RPM for enriched doughs, and total kneading times of 8–15 minutes are standard even at scale.
Home spiral kneader attachments have become available for some high-end stand mixers, and they represent a meaningful improvement over the standard dough hook for bakers who make bread multiple times per week. They reduce friction heating and produce more evenly developed gluten, similar in concept to professional equipment.
The planetary motion of standard stand mixer kneader hooks — where the hook orbits around the bowl while rotating — is less efficient than a spiral kneader but far more versatile, since the same machine accepts whisk and paddle attachments. For home use, the trade-off is entirely reasonable.
Kneading Different Types of Dough: Special Considerations
Pizza Dough
Pizza dough at 60–65% hydration is one of the easiest doughs to knead. It responds well to all three methods. For Neapolitan-style pizza, hand kneading is traditional and produces an extensible dough with good chew. For quick weeknight pizza, the food processor is ideal: a 500-gram batch of pizza dough can be ready for bulk fermentation in under 3 minutes using a food processor, then cold-fermented in the refrigerator for 24–72 hours to develop flavor.
Brioche and Enriched Doughs
Brioche requires building a strong gluten network first, then gradually incorporating cold butter — usually 150–250 grams per 500 grams of flour — after the initial kneading. The butter coats gluten strands, so it must be added slowly in 10-gram increments only after the dough passes the windowpane test. A stand mixer kneader hook is almost essential here: adding 200 grams of butter by hand would require 20–30 minutes of aggressive kneading, and the friction would melt the butter into an oily mess rather than creating the emulsified, pillowy texture of proper brioche.
Sourdough Bread
Most modern sourdough methods deliberately minimize or eliminate mechanical kneading, relying instead on autolyse, stretch-and-fold during bulk fermentation, and lamination folds to develop gluten. This is partly practical — high-hydration sourdoughs at 75–85% hydration are genuinely difficult to knead on a counter — and partly philosophical, since long, cold fermentation and gentle gluten development are thought to produce more complex flavor and better crust development.
If you do choose to machine-knead sourdough, use the stand mixer kneader at speed 2 for no more than 5 minutes, then complete gluten development through stretch-and-fold during the bulk fermentation phase. This hybrid approach works well for beginners who are not yet comfortable with the feel of high-hydration doughs.
Bagel Dough
Bagel dough is among the stiffest bread doughs, typically made at 55–58% hydration. This extreme stiffness makes it taxing to knead by hand for the full 10–12 minutes required. A stand mixer kneader hook running on speed 2 for 8 minutes handles bagel dough well, though you should check regularly that the hook is actually working the dough rather than just pushing it around the bowl. Stiff doughs sometimes need to be repositioned by hand mid-knead to ensure even development.
Dough Temperature Control Across All Three Methods
Professional bakers use a formula called desired dough temperature (DDT) to calculate the correct water temperature for each batch. The formula accounts for ambient air temperature, flour temperature, friction factor, and starter temperature for sourdough. The friction factor is different for each kneading method:
- Hand kneading friction factor: approximately 0°C — minimal heat generated.
- Stand mixer kneader friction factor: approximately 3–5°C — moderate heat from motor and mechanical action.
- Food processor friction factor: approximately 8–12°C — significant heat from high-speed blade rotation.
If your kitchen is at 22°C and your flour is at 22°C and your target dough temperature is 24°C, you would need water at approximately 28°C for hand kneading, 22°C for a stand mixer, and 6°C (refrigerator-cold) for a food processor. These numbers vary by machine efficiency and ambient temperature, but the principle is reliable: the faster the kneading method, the colder your water should be.
Troubleshooting Kneading Problems Regardless of Method
Dough That Stays Sticky
Persistent stickiness after adequate kneading time usually means either the recipe's hydration is naturally high, you have added too much water, or the flour's protein level is insufficient to build a firm network. Resist the urge to add flour. Instead, try wetting your hands instead of flouring them, use a bench scraper to handle the dough, or let the dough rest 5 minutes — short gluten rest often resolves stickiness by giving the proteins time to redistribute.
Dough That Won't Come Together
If the dough remains crumbly or shaggy after 3–4 minutes of kneading, the hydration is likely too low. Add water 1 teaspoon at a time — not tablespoons — and continue kneading. For food processor kneading, this issue often stems from water evaporation; ensure the lid is sealed and liquid is added all at once rather than slowly.
Over-Kneaded Dough
Over-kneaded dough breaks down the gluten network to the point where it becomes sticky and slack rather than elastic. It is difficult to rescue, but refrigerating the dough for 30–60 minutes and then gently folding it can partially restore structure. In practice, over-kneading is rare by hand but possible in a food processor or at high mixer speed. Never run a stand mixer kneader above speed 3 for bread dough, and never process dough in a food processor for more than 90 seconds total.
Dough That Doesn't Pass the Windowpane Test
If the dough tears immediately when stretched for the windowpane test, gluten development is incomplete. Continue kneading in 2-minute increments and test again. If after 15 minutes of hand kneading the dough still tears, check whether your flour has sufficient protein content and whether the dough temperature is warm enough — cold dough below 18°C develops gluten slowly regardless of kneading intensity.
Quick Reference: Kneading Times by Recipe Type
| Dough Type | Hydration | By Hand | Stand Mixer Kneader | Food Processor |
|---|---|---|---|---|
| Sandwich bread | 65–68% | 8–10 min | 5–6 min | 60–75 sec |
| Pizza dough | 60–65% | 8–10 min | 5–6 min | 60–75 sec |
| Bagel dough | 55–58% | 10–12 min | 7–8 min | Not recommended |
| Brioche | 55–60% (before butter) | 15–20 min | 10–12 min | Not recommended |
| Focaccia | 75–80% | 5–7 min (slap-fold) | 5–6 min | Not recommended |
| Sourdough (artisan) | 75–85% | Stretch-fold only | 3–4 min + stretch-fold | Not recommended |